Data Science Getting Started Platform
To get started quickly with data science, I started looking at python and its powerful set of libraries (like pandas, NumPy, Scikit-Learn, etc) that makes data analysis easier. I wanted to have a platform that is accessible over the internet so I can get to it from any laptop/PC that has internet access.
I decided to get a minimal Virtual Private Server (VPS) that supports containers so I can set up a Docker container with all the languages and frameworks/libraries/tools and mount a path on the VPS that contains all the projects I am working on, which will be checked in to git. That way all my projects are versioned controlled and all the platform I need to work on the projects is in a Docker container - if I need to set this up o na different machine all I need is to clone my projects repositories and run the Docker container giving it path to my projects as a mount point.
To set this platform up I found the following tools extremely useful;
- Docker for running containers
- Anaconda which is a complete Python platform for data science
- The Jupyter Notebook which is a very cool web application that allows you to share code, visualizations, text (with full support in markdown), etc - I use this as my IDE
- Amazon Lightsail for cheap reliable VPS
- Gitlab for git repositories
The setup
I purchased the minimal VPS package from Amazon Lightsail (1 Core processor, 512 MB of memoery and 20GB SSD Disk) which was more than enough for my needs, and installed Ubuntu 16.04.1 LTS on it. Once this was up and running and all the ssh connectivity issues were sorted I installed Docker on it so that I can run a Docker image that has all the tools I need.
I found the jupyter/datascience-notebook from docker-stacks to be the best fit for my needs.
The code
I hosted my code on Gitlab and then cloned it locally on the VPS
mkdir dev
cd dev/
git clone [email protected]:haddad/data-science.git
And I had all my code under
/home/ubuntu/dev/data-science
The IDE
Since I wanted my IDE to be accessible from the public internet, I needed to password protect it. The Jupyter notebook allows a single password to protect the instance, so you can’t have multiple users set up on the same notebook. But for my needs this was fine.
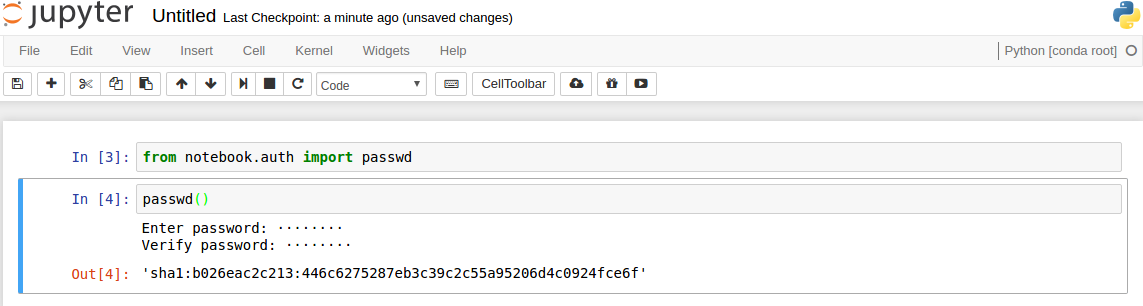
To create a password you need access to a running Jupyter notebook and run the following
from notebook.auth import passwd
passwd()
That will prompt you to enter and verify a password, and after a succesful verification you will get an sha1 hash of your password;
The next step is to run a new container based on the jupyter/datascience-notebook image and give it the right parameters;
docker run -d -p 8888:8888 -e USE_HTTPS=yes --name jupyter  \
     -v /home/ubuntu/dev/data-science:/home/jovyan/work     \
     jupyter/datascience-notebook start-notebook.sh         \
     --NotebookApp.password='sha1:b026eac2c213:446c6275287eb3c39c2c55a95206d4c0924fce6f'
The parameters passed in have the following meanings;
- -d - run this container as a daemon (in the background)
- -p - map external port 8888 to port 8888 of the container
- -e - pass in an environmental variable, in this case we setting the USE_HTTPS variable to YES
- –name - assign a name (jupyter) to this container
- -v - mount volumes, in this case we are mounting the
/home/ubuntu/dev/data-sciencethat we cloned from our git repository to/home/jovyan/workwhere Jupyter expects to find it’s notebooks - jupyter/datascience-notebook is the image that we are running and once it has started we are running start-notebook.sh which takes the parameter –NotebookApp.password for the password, we gave this parameter the sha1 hash we obtained before
Note that since we gave the container a meaningful name, we can stop and start it again in the future simply by running the following commands;
docker stop jupyter
docker start jupyter
That’s all that’s needed, the IDE can now be accessible through https://«your-host»:8888